


Stackable Storage Boxes Workshop Projects
In an attempt to make my workshop more efficient to work in and to keep clean, I’m doing a lot of organizational projects. One of these is this set of storage boxes. Presently, I still have a lot of gear from my old shop in my shed, and would like to move it into this new shop. Of course, I need places to put it. Although most of it will only be used occasionally, I would like it conveniently close at hand. A practical approach would be to make some storage shelves, similar to what I had in my old shop, but space in this new one is at a premium. Also, I don’t want to build in something that I will eventually have to tear out when I move to the shop that is not yet built (assuming I actually build a new shop…).
When I designed my table saw sled, I included a pilaster strip that is normally used for shelving. The reason was to take advantage of the fact that the slots for the shelf clips are exactly 1/2″; apart, for indexing purposes. I had previously used a strip like this to accurately cut the division plate for my advanced box joint jig, and thought it would be a useful addition to the sled.
One of the things the strip will do is to make it possible to cut box joints on the sled. To do this, I constructed a simple jig that straddles the back rail and has a 1/8″; drill bit as an indexing pin that fits into the slots on the strip:
.jpg)
The jig can then be moved accurately by 1/2″; increments.
The biggest advantages of using this as a box joint jig is capacity: it will handle wide stock and can easily cut multiple pieces. On the down side, it is cumbersome to use and it’s much easier to make a mistake, if you are not paying close attention. It’s also limited to box joints that are a multiple of 1/4″;. Of course, that’s probably not a big drawback for most people, myself included.
Before getting started on the boxes, I made up a cutting diagram for a full sheet of plywood:
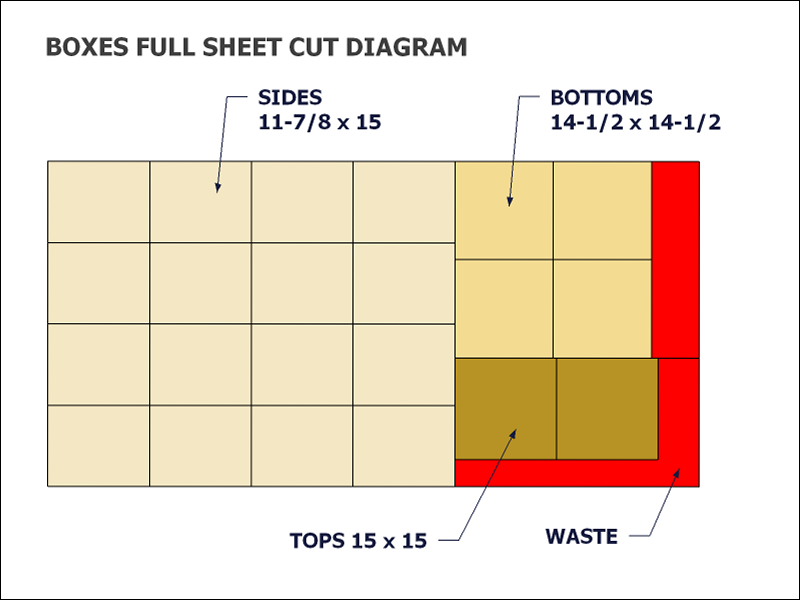
The idea was to get four boxes complete from the sheet, with enough left over to make lids for two of them. The size is loosely based on a milk crate, but with an extra two inches of depth.
To break the sheet down into more manageable size pieces, I made the first cuts using the saw board and circular saw:
.jpg)
.jpg)
Then finished all of the cuts on the table saw. Stacked up are the sixteen sides and the four bottom panels.
The bottom will fit into a groove cut in the sides, and I’ve set up a 1/2″; dado blade in the table saw:
.jpg)
.jpg)
The dado is set to cut 1/4″; deep and is 1/4″; from the fence.
The next step is to cut handle holes in half the side panels. To do that, I drilled 1-1/4″; holes, 4″; apart:
.jpg)
.jpg)
Then connected them with the jigsaw to complete the opening. It’s nice to finally have the workbench clean enough to do some work on!
With the handle holes cut, I moved on to the interesting part: cutting the box joints. It took some time to get the dado set up to the right thickness to make a well fitting joint. I could then load up eight of the sides to cut:
.jpg)
The cutting went fairly quickly and I ended up with very well matched joints. The cuts weren’t perfect, since there is some thickness variation with this plywood that caused tear-out on a couple of pieces, but these are not meant to be fine furniture.
.jpg)
I used polyurethane construction adhesive in the dados for the bottoms and the box joints. The long open time of this glue makes assembly a lot less stressful:
.jpg)
.jpg)
It takes little clamping pressure, just enough to pull the joints together. I’m using some of my longer homemade clamps.
After the glue dried overnight, I sanded the boxes smooth(ish) and added the feet. I then put them where they were made to go, right beside my sanding station.
Loading them up:
.jpg)
.jpg)
Tidy and tough, these boxes will see a lot of use for years to come. As soon as I have the time, I will make four more like this and add those to the stack.
I made a very detailed video of the project:

These may not be as glamorous as a solid wood tool chest with 30 drawers and compartments, but they more than adequately get the job done.


