


Making A Wooden Pocket Knife General Woodworking
I built my first wooden knife nearly three years ago as a mock-up for a real, metal knife. I never did get around to making the metal version, but the wooden one turned out to be very popular. I didn’t make a build video for it, since I really didn’t think anyone would be interested. As it turns out, I was wrong and the video I did make (just a slideshow of the pictures from the build) has gotten a lot of views.
I figured it would be worthwhile to do it again, except this time I made a very detailed video, and that (along with the free, printable template) is at the end of this article.
Here are most of the things you will need to make the knife. I forgot to include clamps, you’ll need two of those to hold the parts. A vise would also be handy, but not strictly necessary:
.jpg)
I’m using two types of hardwood, walnut for the handles and maple for the blade, butt, spring and spline lock. Any type of hardwood can be used and even some types of harder softwood, but I would not recommend any of the softer varieties.
The wood needs to be a uniform thickness (3/16″) and you can either cut that with a handsaw, or with a table saw. Using the handsaw is slower and generally leaves a rougher, less uniform cut, but that can be cleaned up with a hand plane or a sanding block:
.jpg)
.jpg)
With the stock prepared, I cut out the templates and used a glue stick to attach them. I could then drill the holes using a drill press:
.jpg)
.jpg)
If you don’t have a drill press, you can make a simple guide from thicker sheet metal to help drill the holes accurately. I’m using an electrical box cover plate that I’ve clamped down to my bench. I drilled a 1/8″ hole and a 1/4″ hole through and then filed off the burr:
.jpg)
.jpg)
To use the guide, simply line it up with the marks on the template, clamp it down securely and drill the hole. You’ll want to go slow and keep the drill as vertical as you can:
.jpg)
.jpg)
After all of the holes are drilled, it’s time to cut out the parts. I’m using a coping saw, but if you have a scroll saw or band saw, those would work too. I don’t recommend using a jigsaw, since it can be a bit too aggressive for cutting out smaller parts:
.jpg)
.jpg)
The slot for the spring in the butt can be tricky. Another way to do this is to use two stacked hacksaw blades to make the wider cut at once. I used that method in the first knife build.
Speaking of the spring, it’s a good idea to split the stock to do the first cut, since it will leave the wood with continuous straight grain that is less likely to break:
.jpg)
.jpg)
The spring is then sanded down to the final thickness on the sanding block.
Another possibility, and probably one that is easier to do, is to make the spring from stiff plastic. If you can find some that’s the right thickness, or you can always cut something to fit, like a piece of PVC pipe:
.jpg)
.jpg)
The shaping of the parts takes a while to do, and you really need to take your time and do it as accurately as you can. I used a combination of files and my sanding block to trim the wood down to the lines on the glued on templates:
.jpg)
.jpg)
.jpg)
If you happen to have a small belt sander, you can save a lot of time. Also, the coping saw will get into small places for quick stock removal before fine tuning with a file:
.jpg)
.jpg)
Speaking of fine tuning, the spine lock needs to be very accurately done, so slow down and check the fit often:
.jpg)
.jpg)
.jpg)
Check how tightly the dowel fits in the blade pivot hole, and ream it out either with the 1/4″ drill bit or a small round file. The dowel should turn easily (but not loosely) in the hole:
.jpg)
.jpg)
The same needs to be done with the hole in the spine lock. I’m using a needle file to slightly enlarge the hole so that the dowel turns freely:
.jpg)
.jpg)
The blade and the spine lock need to be sanded slightly thinner than the butt, so that they will move freely:
.jpg)
.jpg)
When all of the parts are done, a dry fit will show what needs to be adjusted:
.jpg)
.jpg)
.jpg)
Next, the butt is fastened to one handle scale using the super glue. After it has set, I checked that the spring works correctly and puts the right amount of tension on the spine lock:
.jpg)
.jpg)
The other handle scale is put on dry and I tested the operation of the knife again. I found that the spine lock was a bit sticky, so I sanded the ends a bit more, leaving it the same thickness in the middle. When I was satisfied that it was working correctly, I glued the other handle scale to the butt:
.jpg)
.jpg)
The pins are marked and cut to length, leaving them a bit long:
.jpg)
.jpg)
I put paper shims between the handles and the blade to give enough space for the blade to rotate freely after the pins are glued. I could then sand the pins down flush with the handle on one side:
.jpg)
.jpg)
I used the super glue on the ends of the dowels, counting on it seeping down enough to glue them in place:
.jpg)
And the other side was done the same way, sand the dowels flush and put the glue on.
The thumb stud is just a small piece of the maple cut from the blade stock and glued onto the blade with super glue. After that was dry, I spent some time doing the final sanding:
.jpg)
.jpg)
I didn’t bother to “sharpen” the blade on this one. For the finish, I’m using mineral oil:
.jpg)
.jpg)
Rubbing it in with my bare hands and wiping off the excess:
.jpg)
.jpg)
Mineral oil doesn’t harden like boiled linseed oil and it’s what I’d recommend for this knife. Any other type of finish may glue the parts together enough to make it so that it doesn’t work anymore. As you can see, it really makes the wood grain come to life and I would just reapply the oil periodically.
The knife was a pleasure to do and although it doesn’t actually cut, it does look great:
.jpg)
.jpg)
Also, it was a chance to refine the design and get more practice for when I do finally make the real one, from steel.
If you would like to make your own, you can use this template:
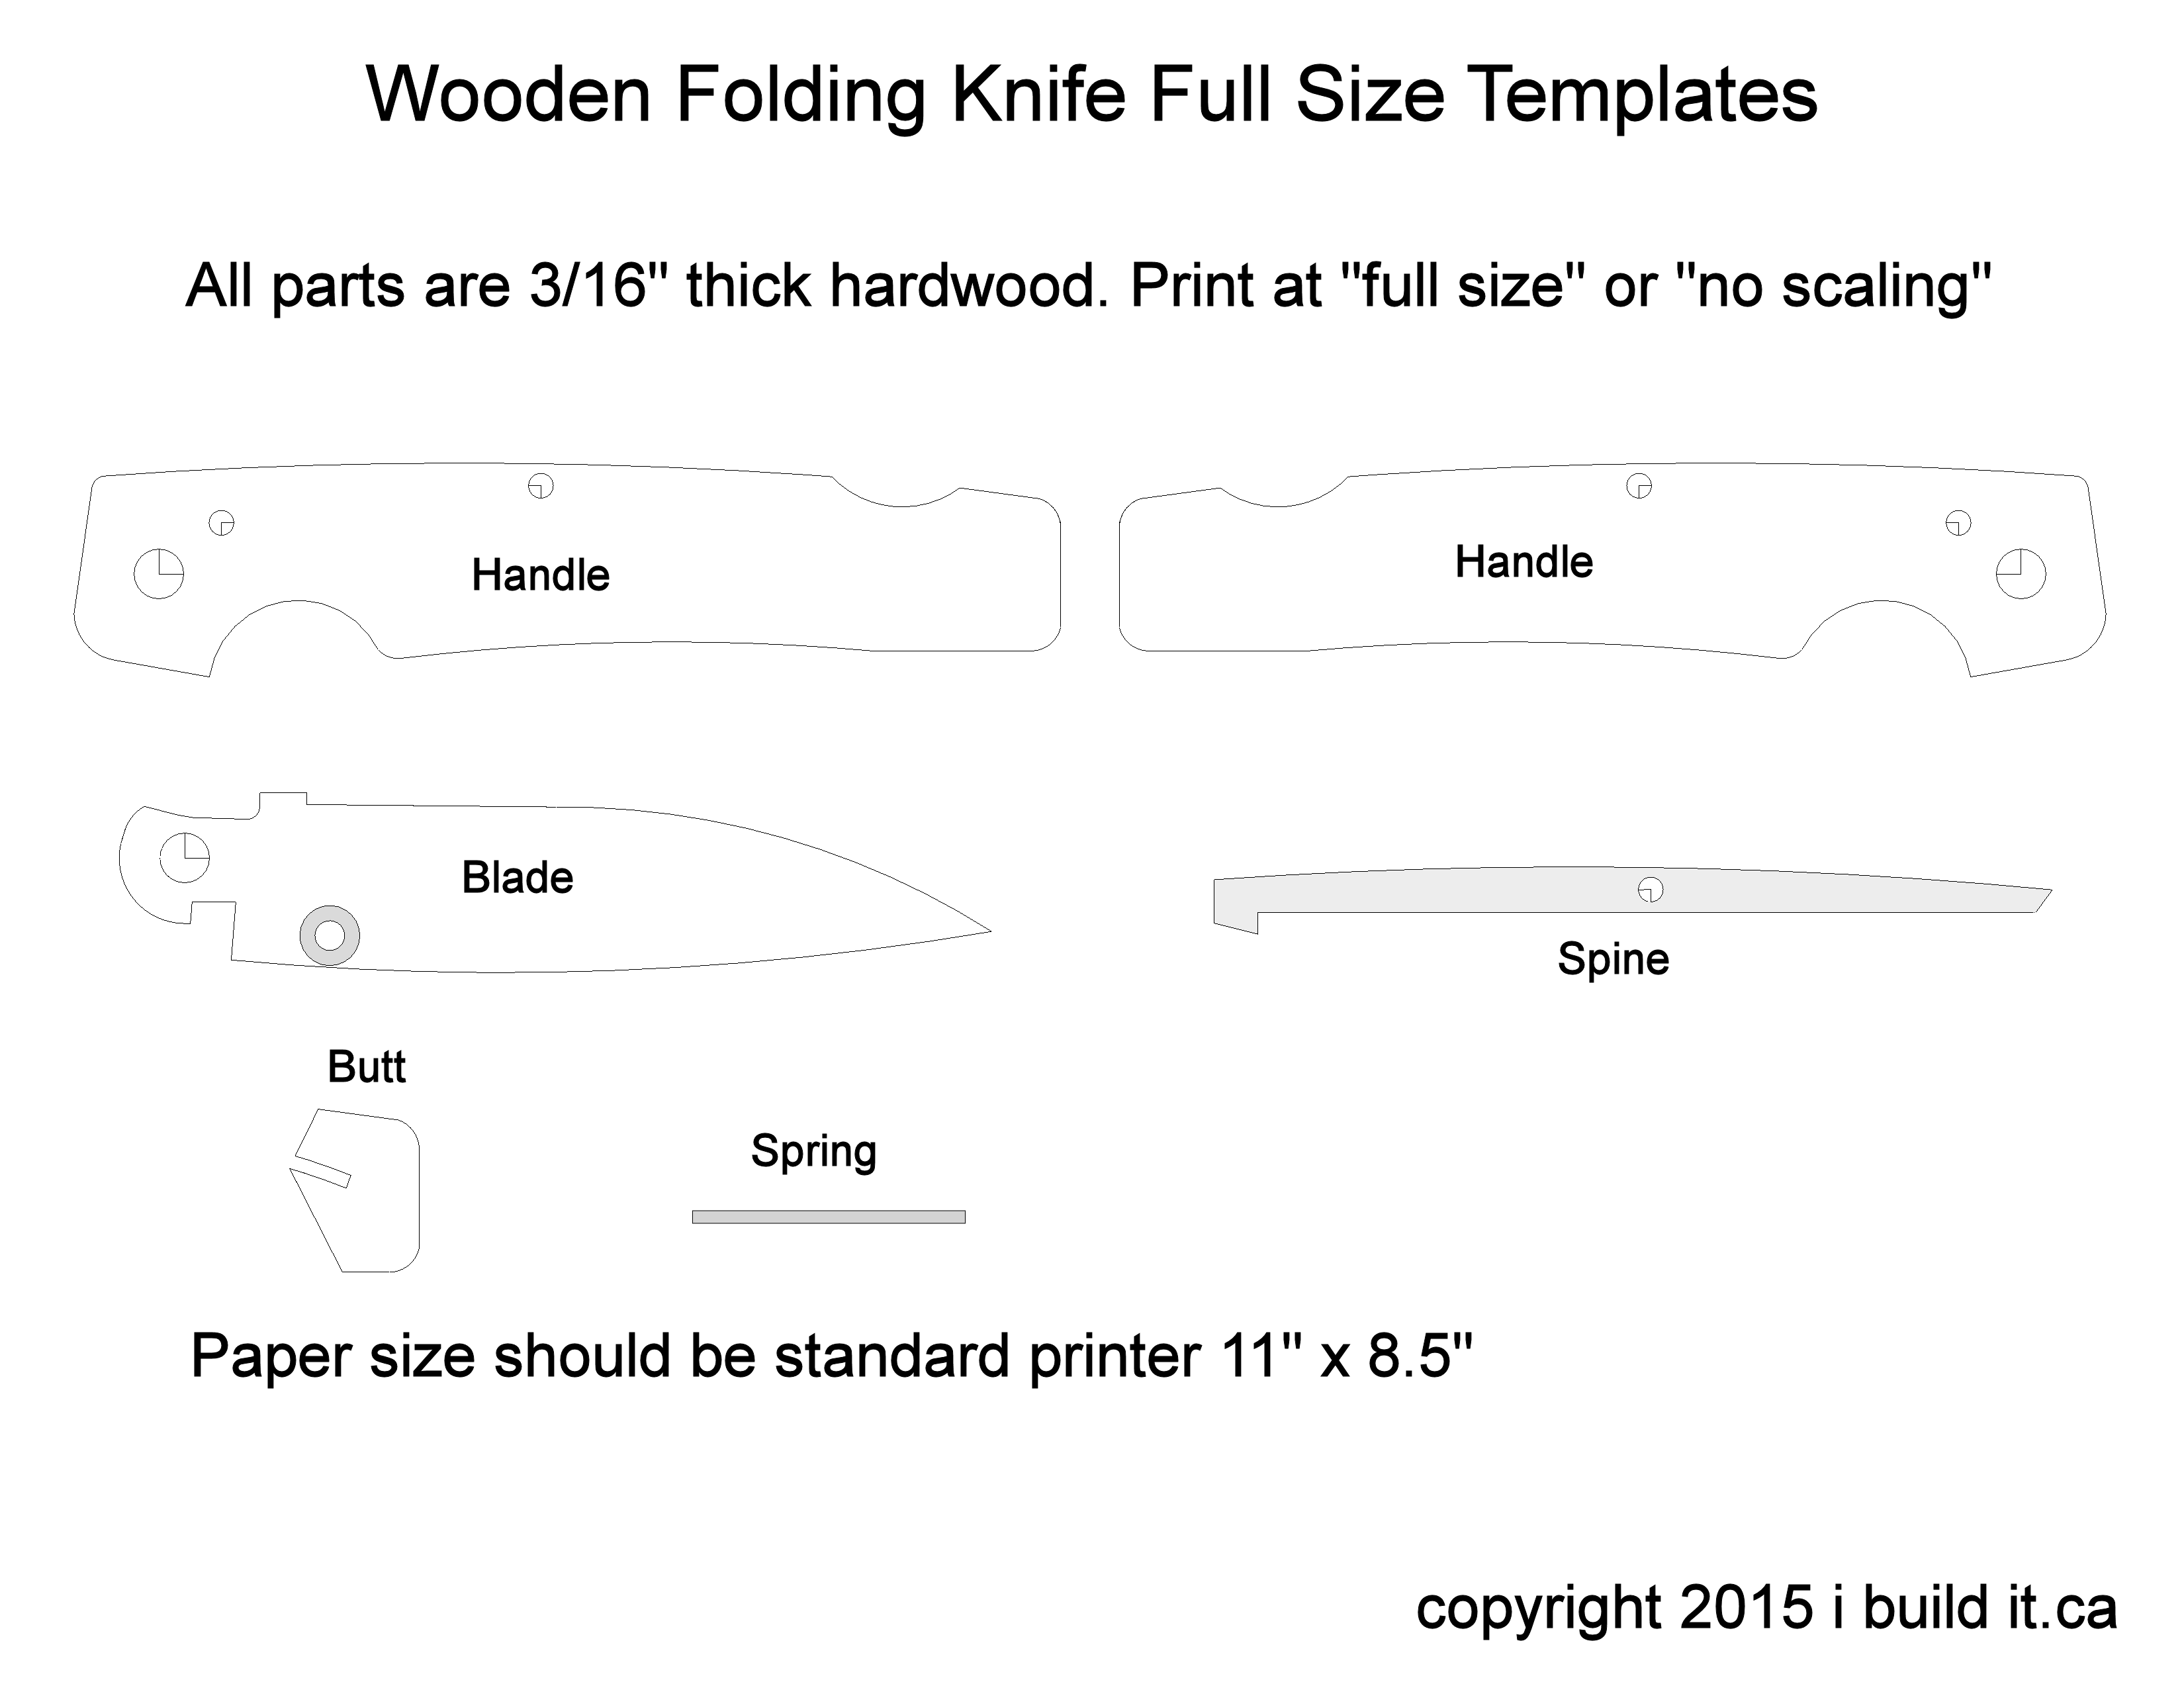
Click the image to open it full size, then save it to your computer. Set your printer to “full size” and “no scaling” to get an accurate print. The paper size should be standard 11″ x 8.5″ printer paper.
I made this video showing the build from beginning to end:


.jpg)