Blog: To Paint Or Not To Paint your shop projects By: John Heisz
The question: Should you paint your homemade tools and shop projects?
The answer: Yes and no.
Sounds confusing, right? I’ll explain.
In the beginning, I made tools and projects for the shop and the only requirement was that they work well. Or, at least well enough to justify the time I had spent making them. If I thought I had done a particularly nice job with something, I would paint it to look more “professional”. And for the most part I still do that today, but now I have other considerations.
It’s been a long time since I made something that flat out failed or didn’t work, so the utility of my projects is almost a given. However, I still feel the compulsion to make the better ones look like they were manufactured rather than shop built, by painting them. A fairly recent example of that is my wooden 2″ x 72″ belt grinder where I painted it red and black. While the paint job did make the tool look more like something that was bought than built, it also caused some problems. First is that paint can interfere with moving parts. The boom arm on the grinder, for example, was tightly locked in place by the paint and I had to pound on it with a heavy mallet to free it up. Paint, even when fully dry, can be quite sticky.

If I had it to do over, I would have spent a bit more time sanding the parts to look good with just a simple clear finish. Not only would it have worked better (boom arm wouldn’t lock up), but it would also look more homemade. And for me, because I sell plans for some of the tools I make, that would probably work out better.
I should say here that it’s generally important to apply some kind of protection to your wooden projects, but a single wiped on coat of clear water based polyurethane will usually do the trick. And it’s easy to renew when needed – just lightly sand and wipe on a new coat.
For other projects, like my precision router lift, it’s best to avoid any kind of film finish at all. Anything that has high tolerance moving parts can be fouled by even a thin polyurethane finish, and I try to avoid it if possible. Better to use a non-drying mineral oil or petroleum jelly to lubricate the raw moving parts, and protect the rest of it by installing it into a fairly closed off space. For example, my new router table completely encloses the router lift and protects it. The router table can be fully finished, either with paint or with clear poly.
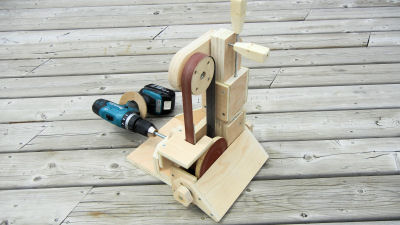
Another regret, but not one that affected the operation of the tool, is my belt / disk sander:

Shown here painted, but I I think it looked better before I painted it, more authentic:

Again, just spend a bit more time to sand it, then a couple of coats of poly to keep it looking good. I will be having another kick at that particular cat soon, since I want to improve and rebuild this sander before mounting it on its own stand with built-in dust collection.
While paint can make a homemade machine or jig look more like something that was mass produced, it can also make it look like it’s a cheap manufactured product, and I think that’s the case with my belt / disk sander.
At the other end of the spectrum, there are things that will only look good if they are painted. My homemade band saw is a good example. Since it was made from a variety of materials, including steel that was rusty and welded together, painting is really the only option:

I did leave the top natural with three coats of oil based poly (something else I would use again), since paint won’t hold up to wear. I occasionally get comment on my videos that show this saw asking what brand it is.
So, in conclusion I would say that you should consider the the things I mentioned above even before starting the project. If you are the type that wants everything in your shop to have the neat, uniform look of manufactured tools, you should pick out the colour and do the painting while building it, so that you don’t end up with parts that don’t work due to clearance issues, or parts that are stuck together when they should be free to move. A good example of that is my new jointer build where I’m clear finishing the parts as I go.
And if you like the look of a wooden project in its natural state, it’s best to be picky over the type of wood (or plywood) you use and be extra careful when assembling it to make the end result worthy of a clear finish. It’s also possible to stain the project to make it a different colour, and that’s not limited to the standard wood stains. I “stained” the office furniture I made in my last house (desk and file cabinet) with thinned blue paint. Three coats of clear poly on top of the stain finished it. So, the best of both – a definite colour, but an application that lets the natural wood grain show through.
That is, of course, if you are at all interesting in how the thing looks. At the end of the day, whether the project actually works right is the most important factor.
I made a video where I talked about these things while working on my new shop lighting:


