


Making A Heat Treatment Oven Fun & Interesting
This project has been on my to do list for quite some time. About three years ago I bought the parts needed to get it done, but never did set aside the time needed to actually do it. I can give all kinds of reasons for not building it sooner, but primarily I didn’t have a real need for it and no definite projects that use it, until now. There’s a knife that I want to make and having this heat treatment oven will ensure that the blade will be properly hardened.
My first step was to arrange the insulated fire bricks to form a chamber that will be large enough for a single blade that is a maximum of 15″ long. These bricks are 9″ long, 4-1/2″ wide and 2-1/2″ thick and are rated for 2300 degrees Fahrenheit:
.jpg)
This leaves a chamber that is 4″ wide, 4-1/2″ high and 15-1/2″ deep, which is plenty of space for any single blade that I would make. Of course, knives are not the only thing that needs heat treating – plane blades and chisels or other tools can also benefit greatly from precise hardening.
I’m making the outer case of the oven from 18 gauge sheet metal salvaged from doors that I cut windows into, back while doing my old day job. I cut the parts and tacked them together so that the bricks would fit inside snuggly, then just tacked the parts together using the welder:
.jpg)
.jpg)
I made a handle to easily move the oven. Notice that it is offset toward the front to make up for extra weight of the door:
.jpg)
Speaking of the door, it is swung on inexpensive tee hinges that I welded on. I used a piece of sheet metal to shim the door up to space it away from the case slightly so that it won’t bind:
.jpg)
.jpg)
To act as a handle and double as a latch, I welded on this strip:
.jpg)
I added the rectangular nuts to the side for the latch to slip into. This mainly provides support for the door when closed to keep it from sagging:
.jpg)
With the outside of the oven done for now, I turned my attention to grooving the bricks for the heating element to fit into. To do that I made this simple tool:
.jpg)
Just a piece of sheet metal the right width screwed to a block, with another block that acts as an edge guide.
These bricks are remarkably soft, and cutting the grooves was easy:
.jpg)
The only tricky part was the curve where the single element returns:
.jpg)
The stretched out element was then put into the groove and I used staples made from the element wire to hold it in place:
.jpg)
After I had it and the bricks installed in the oven, I hooked up a cord temporarily to test it:
.jpg)
Next up, the controls for the oven centre around a PID to regulate the temperature, a thermocouple to sense the temperature inside the oven, and a relay to switch the element off and on. This schematic shows the basic circuit:
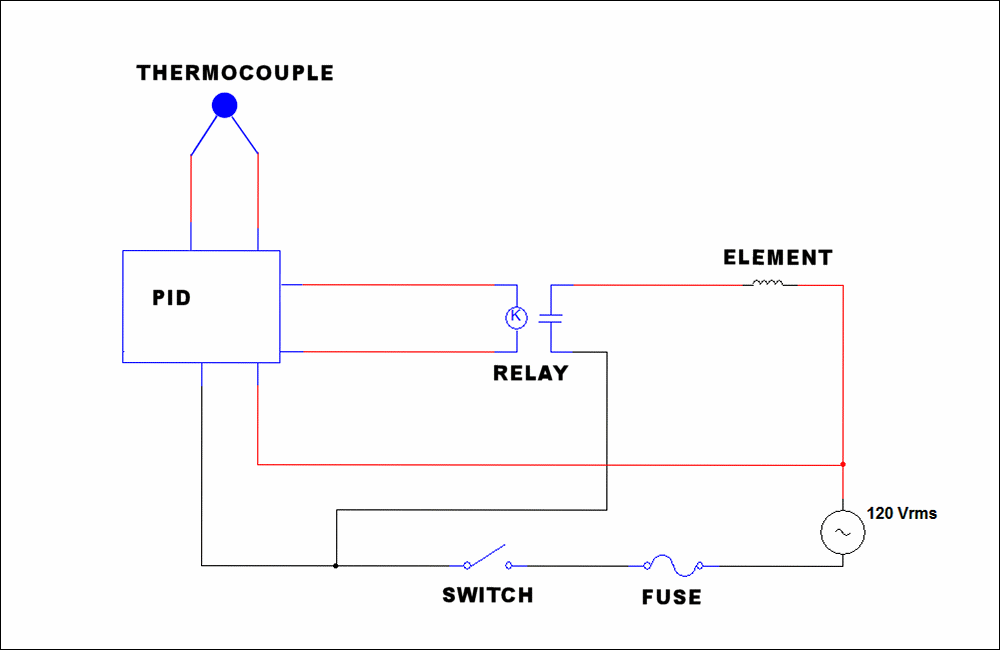
My oven operates on 120VAC and has an element that is around 1500 watts, so I used a 15 amp circuit breaker in place of the fuse and switch combination.
Where the element leads come through the side of the case, I attached the connectors and used a piece of heat resistant perf board to act as an insulator to keep the connectors from touching the case:
.jpg)
The connection here must be mechanical, such as shown and the wires that connect to it should also be heat resistant.
The back panel of the control box is a piece of 1/8″ thick aluminum that also acts as the heatsink for the solid state relay:
.jpg)
I cut out the front panel with tabs on the edge to fasten it to the case with sheet metal screws. In the videos near the bottom of this page I show how I cut out the square hole for the PID and the rectangular hole for the circuit breaker / switch:
.jpg)
.jpg)
The wiring is done before the control box is assembled, since it’s easier to get everything hooked up and check for mistakes. Note the ground wire (green) that is fastened to the back panel of the control box. All exposed metal surfaces of an appliance like this need to be connected to this ground wire:
.jpg)
With everything connected, I ran a test to make sure everything was working properly before putting on the cover:
.jpg)
.jpg)
I set the PID for 1000 degrees Fahrenheit and it had no problem reaching that and holding it there.
Next, I did a more practical test. I have this old file that I want to make a knife from an dit needs to be annealed (softened) before I can do that:
.jpg)
To anneal a hardened metal, you heat it up to the right temperature and then leave it to cool slowly:
.jpg)
Since this file steel is close in properties to W1 steel, I used that and heated it up to 1400 degrees before shutting it off and leaving it to cool overnight:
.jpg)
The next day the file was softened to the point where it could be filed with another file. It’s now ready to be worked and formed into the knife I want to make.
The next test was to see if the oven would reach the maximum temperature that I want it to, and that’s 1900 degrees Fahrenheit for heat treating stainless steel:
.jpg)
It took a while, but it did get there.
Running it at that high temp did heat up the case and the control box, so I thought that some vent holes would be smart to let some cool air circulate:
.jpg)
I drilled holes in the bottom as well.
Also at high heat, I noticed the door was coming slightly open, so I added these screw clamps to keep it tightly closed:
.jpg)
The oven will be more efficient if it keeps in as much of the heat as possible.
The finished oven:
.jpg)
I’ve no plans to paint it, since it is purely a utilitarian build and besides, I kind of like the industrial look it has.
I made a detailed series of videos:


