Making Drawers for Cabinets Workshop Projects
The next phase of the base cabinet project is to make the drawers, fourteen of them. The method shown here is probably my favourite and I’ve used it on another project featured here on this website, my scrap wood cabinet with drawers:

The method uses what I call a partial dado to lock the parts together to add strength and keep then lined up during assembly. The big benefit is that it’s very easy to do and doesn’t require anything other than a table saw.
Here are the new base cabinets installed in the corner:

It’s a bit of a tight spot in there with the old cabinet still in place. Everything that’s in the old cabinet will be move into the new one after it’s finished.
Nearly two full sheets of 1/2″ plywood were used to make all of the drawer parts:

Drawers are efficient and convenient storage, but making them does consume a lot of time and material.
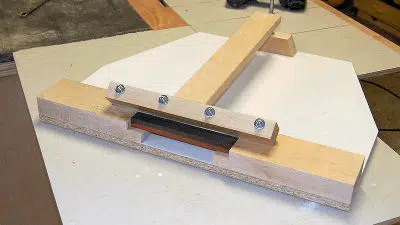
Here’s the partial dado, basically a small tongue and groove joint:

I made the parts that will have the tongue (back, front and bottom panel) wider by 1/4″. The tongue is 1/8″ x 1/8″ and made with a single cut with a 1/8″ kerf blade on the table saw.
The grooves are then cut into the side panels:

Again, just a single cut with the 1/8″ kerf blade 1/8″ deep.
A dry fit shows how it works:

This adds strength when the plywood is oriented so that the end grain of the tongue goes into the groove, as it is with the drawer above. This is also true if the parts are made from solid wood.
I only have enough longer clamps to assemble four boxes at a time:

But did have other work to do while waiting for the glue to dry. Here are the parts for the drawer fronts:

These are solid oak and were milled from rough lumber. Normally I’d use plywood for shop cabinet drawer fronts and just edge band them, but figured that would take longer than making them from solid wood.
To reinforce the joint at the front of the drawer, I used an interesting stepped dowel system that I’ve been meaning to try out:

I bought this more than a year ago and kind of forgot about it. The benefit from using these is that they not only add shear strength, but also hold the parts together much like a screw.
I think a regular dowel that’s glued in properly would be just as effective. Or a screw – nothing wrong with using screws!
All of the boxes assembled and ready to install:

I decided I’d use the same type of handle that I made for the old cabinet. These were easy to make and install and have held up perfectly over the years:

I go into a bit more detail on how the drawer fronts were fastened in the build video at the bottom of this article.

I took them out again and gave them two coats of water based polyurethane to protect and keep them looking good:

I’ll make a top and toe kick panel for it soon, and then I can start building the cabinet that goes above it.
The build video: