


Making The Ultimate Sanding Block Homemade Woodworking Tools
Sanding, especially hand sanding, is a pain. Anything that can help make the job easier and go faster is welcome, such as a well made sanding block. Unfortunately, finding a good, practical sanding block appears to be next to impossible. At least I haven’t had much luck. I’ve had a few of the usual suspects and have not been happy with their performance.
To satisfy my needs, I worked out a design for what I believe is the ultimate sanding block (at least for me).
Design criteria: Since I do all of my hand sanding with standard size sheets cut into quarters (I fold these in thirds and this is an excellent size for almost every small sanding task), the hand sander should use this size of paper – 1/4 sheet (just like a palm sander).
Next, it has to be comfortable and low profile. I’m not crazy about scuffing my knuckles when the too-tall
sanding block rolls over. I want a grip that doesn’t have any sharp corners or edges, and no obstructions. Whatever holds the paper on better not be in the grip area.
Finally, it needs to be lightweight and sturdy, easy to build and require no tools to change the paper – no screws to tighten or wing nuts to lose.
Tall order?
Starting with two parts:
.jpg)
1/4″ plywood for the sole, 2 x 4 spruce for the handle. The sole is 3-3/8″ wide, 5-1/4″ long. The edges are slightly rounded so as not to tear the paper. As shown, the paper wraps around leaving 1/4″ of the paper on the top. This sander is not padded, which is best for sanding flat surfaces. Adding a pad to the sole can be done and the sole and handle width will need to be reduced to compensate. For example: for a 1/16″ thick pad, the sole and handle should be 1/8″ narrower, or 3-1/4″ to end up with that 1/4″ of paper on the top of the sole.
The first cut to form the handle are angled 73 degrees, 1″ deep:
.jpg)
.jpg)
The next is another 73 degree cut that meets the first.
The corners are knocked off:
.jpg)
.jpg)
Some sanding is done to smooth it:
.jpg)
Next comes the tricky part. To lock the sole onto the handle, I’m using a sliding dovetail, but one that tapers by 2 degrees (each side) as well:
.jpg)
This is done using a jig on the table saw (shown further down this page) and accuracy is important but not critical, since the mating part can be adjusted to fit.
The slot is cleaned out:
.jpg)
.jpg)
Here’s the jig that is used to make the cuts shown above:
.jpg)
Just a piece of plywood cut at 88 degrees with another piece of plywood screwed on the end as a stop. This allows the work to be run through the saw at the correct angle. Above, I’m using it to cut the matching dovetail that will fit in the one that I cut in the handle. I’m cutting this part from hardwood.
The angle cuts are made to the correct depth:
.jpg)
.jpg)
A straight vertical cut removes the piece from the larger block.
It’s longer than needed, to allow for adjustment. I got lucky here though, it’s a perfect fit:
.jpg)
It’s at this point that I realize that having the handle the same length as the sole is a mistake – with the sandpaper in place, the handle would not slide out flush with the end. This was due to the thickness of the sandpaper between the sole and the handle and to fix this, I later cut the handle about 1/2″ shorter.
Lining up the dovetail before gluing:
.jpg)
.jpg)
Gluing the dovetail onto the sole.
Finished:
.jpg)
.jpg)
Sliding the handle on locks the paper tightly in place.
A successful project, the sander easily meets all of my design goals and is quite comfortable to use. The dovetail has a surprisingly good grip on the handle – vigorous sanding doesn’t loosen it.
A drawing for the sanding block is available:
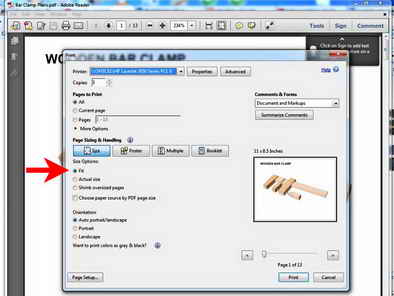
They are in a printable pdf format. Chances are that you already have Adobe reader installed on your computer, and that is what is needed to view and print these files. Adobe reader is a free download available here.
To print, setting it to “fit” will give the best results. This is a screenshot of the print utility in Adobe reader:
February 2014 Update:
I’ve had a few people ask if there was another way to cut the tapered dovetail, saying that it’s very difficult to cut it accurately. This is understandable, since the parts are fairly small. I gave it some thought and came up with a different method to make the tapered dovetail that is quite a bit easier than what’s shown above. Also, I wanted to make a video on this sanding block, since I didn’t get one done for the original project. In it, I demonstrate the easier way to make the dovetail parts:

The basic idea is to cut the parts straight, then glue them on on an angle to make the taper:
.jpg)
.jpg)
The wider pieces fit in and are glued onto the handle.
What you wind up with is a bit thicker, but still quite comfortable to use:
.jpg)
.jpg)
I hope that helps out future builders. If you are up for the challenge, the original method still gives the best results, with the overall height of the sanding block lower to the surface.
.jpg)


