


Making A Down Draft Sanding Table With Storage Workshop Projects
A downdraft sanding table with a whole lotta storage. The storage will mainly be devoted to fasteners (various screws, bolts, nuts, etc.) and will be 2 banks of 6 drawers plus a bank of pull out bins in the centre. The idea is to create a dedicated surface for sanding wooden parts and make good use of the space below.
The top will be 48″; x 24″;, covered with 1″; thick rubber gym flooring. It has a tough outer layer that should stand up to lots of sanding abuse and the resilient surface will not mark the wood as it is being sanded. The top and the underlying plywood base will be perforated with evenly spaced 1″; holes and will be removable. The chamber underneath will connect to a dust collector through a port at the rear of the unit. This should catch most of the fine dust from using the hand held sanders:

The drawers will be made from 1/2″; and 5/8″; thick plywood. The bottoms of the drawers will be 1/4″; thick OSB, for economy. OSB is good for this, as it is strong and relatively lightweight. The dividers will be 1/4″; thick plywood, simply glued in place.
The body of the table will be constructed from 1/2″; G1S (good one side) plywood. The edges of the plywood that face up and to the front will be trimmed with solid maple. This trim serves 2 purposes: first, it makes these edges more durable and second, it covers the edge grain of the plywood. This improves the appearance of the table, making it look more finished.
The trim is attached with glue and 1 1/4″; airgun nails. No nail gun? No problem, regular nails work too, as well as just using glue and clamps.
The middle section of the cabinet is the duct for the dust collection. There are 2 dividing panels that leave a 5″; space between the 2 outer banks of drawers. The front part of this space is used for pull out bins, 5″; wide, 7″; deep and 3 7/8″; high. These bins will be for wood screws that are more commonly used in projects.
The drawer slides are simple wooden ones, “;L”; shaped and slightly beveled toward the front. This slight bevel gives more side to side room at the front of the drawer and seems to make it easier to open and close the drawer without binding. I first used this method on the sanding station project with excellent results.
Starting the build today, I found that I did not have enough plywood on hand, but I did have a piece of 1/2″; OSB. I used that for the back of the cabinet and for the bottom of the ‘dust chamber’:
.jpg)
Like the drawer bottoms, OSB is a good choice for both of these locations – it’s strong and reasonably lightweight (hey, it’s cheap too!) and will almost never be seen.
Next I put in the cabinet bottom, added the solid wood edging and glued down the gym flooring to the top:
.jpg)
The padding is in three pieces, since I didn’t have a single piece big enough to cover the entire top. PL Premium construction adhesive was used to glue the padding down and screws driven through the padding and into the plywood below hold it in place while the glue dries. The screws are in the locations that I laid out to drill the downdraft holes, so no damage done.
The top of the padding is left slightly above the wood edging – this was intentional, as I don’t want to hit the wood edging while sanding parts on there.
To secure the sides of the centre section, some blocking is installed. Here I’m making sure that it is absolute dead centre using 2 sticks of equal length. I find this method to be a lot more accurate and convenient than using a measuring tape. The blocking gets nailed and glued in:
.jpg)
The front part is set the same way. This space forms the dust collector duct from the chamber above. A 4″; hole will be cut at the back of this space for connection to the dust collector.
And here’s the completed centre section:
.jpg)
With that done, there’s not much left to do other than drawers, drawers and more drawers…(oh yeah, bins too).
A brief video showing some of the progress to this point:

There are many options available for drawer slides, I’ve often used the cheap metal ones and these perform very well if installed correctly. They can loosen up over time though and are somewhat noisy.
There are better slides, but these can be expensive. For example, 12 pairs of 16″; full extension 100lb slides would be $140 plus sales tax and shipping or fuel cost to pick up. Certainly, a reasonable expense under the right circumstances.
These cost roughly $5:
.jpg)
Made from pine, they are “;L”; shaped to guide the bottom and side of the drawer. The benefit of this type of drawer slide (beside the low cost) is that they can support a tremendous amount of weight, as the drawers below help to support the ones above. They are also very quiet in use, which is important to me.
The slides are specially shaped: tapered toward the front. This was done using a shop built jig on the table saw to cut a slight taper in the finished slide. The slides were installed with glue (PL Premium) and nails. The nails act as clamps, to hold the slides in place until the glue dries.
The pine stretcher seen in the picture above is to brace the outer side of the cabinet and was attached to the slides prior to their being installed. It helps to maintain the correct distance between the sides.
Here I’m already making good use of the sanding surface. This is a piece of 5/8″; plywood for the drawer box sides that I sanded smooth. As can be seen, the dust collection was not yet connected, so no practical test of that capability yet. The good news is that it seems to be an excellent sanding surface:
.jpg)
A pile of parts for the 12 drawers. Sides are 5/8″; spruce plywood. I had some off cuts from a another project sitting around and thought that it would be very suitable for the drawer sides. I cut them to width and ran them through the thickness planer to smooth and fair them up. I then sanded them with my random orbit sander (as seen above).
Fronts and backs of the drawer boxes are 1/2″; G1S plywood. Scraps mostly, off cuts from making this cabinet and the sanding station:
.jpg)
The drawers are put together with butt joints, glued and nailed with 1 1/2″; nails. Since this is a shop cabinet, it would be difficult to justify the extra work involved in doing dovetails for the drawers. In my humble opinion, dovetails are for looks first and function second, and given the strength and durability of the glue used, there is little to be gained by using advanced joinery in this instance:
.jpg)
Bottoms are 1/4″; OSB and are fully glued in. Many will say that drawer bottoms should not be glued in, but when using a dimensionally stable material like OSB, there is no reason not to – it will not expand and contract significantly with seasonal humidity changes. Indeed, the drawer will be much stronger if the bottom is glued in.
Drawers fitted, bins made and notched for a finger pull:
The drawers still need dividers and fronts. The layout for the dividers will vary, according to what I want to put in them. The fronts will be solid pine.
The bins are made from 1/2″; spruce plywood that was planed and sanded smooth. Again, put together with butt joints, glued and nailed. A semi-circular cut was made in each bin to create a pull. This was done with a 2″; hole saw and guide. The cut was then cleaned up on the spindle sander.
Here’s a video of how the holes were drilled in the top and how the drawers were assembled:
There are a couple good reasons to put proper fronts on the drawers: First, it limits the amount of dust that can get in by closing the gap around the drawers. Second, it pretties the project up. Just because it’s for the shop, doesn’t mean it has to look crude.
The fronts are solid pine and I was careful to pick some very clear (no knots or defects) stock for a clean look:
.jpg)
The fronts were cut to fit with a 1/8″; gap on all sides and tacked to the drawer boxes with 1″; nails. I then screwed the fronts on from inside the drawer using 1″; screws. I numbered each drawer and the space it fits in to avoid getting them mixed up, since each drawer is custom fit to the space it’s in.
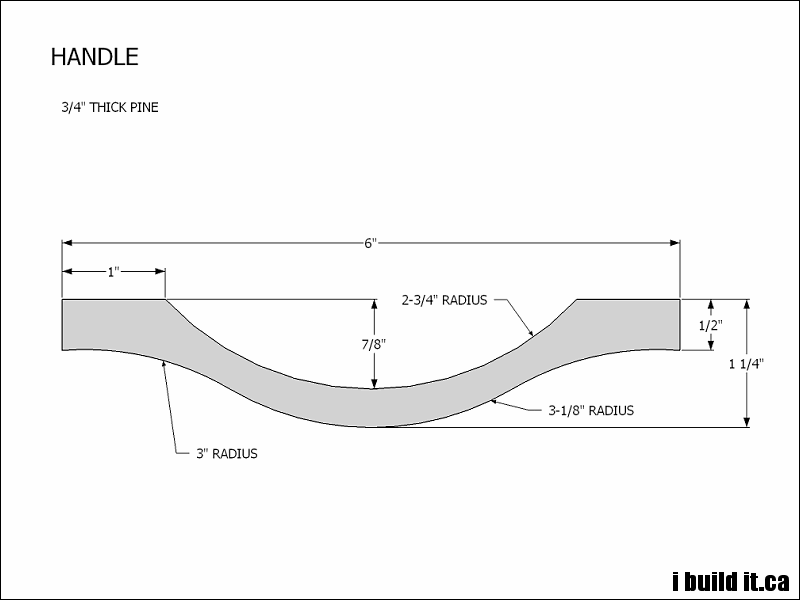
Notice that I changed my mind on the pulls – hit by inspiration this morning, I designed these and cut them out:
.jpg)
Cut on the band saw, I put my new spindle sander to good use to smooth them. They are solid pine and just glued on, which should be enough to hold them solidly. I’m more worried about them cracking where they are thin and cut across the grain. Time will tell, I think they’ll be fine.
I do know that it only took about 30 minutes to make these complete (from scraps) and that the metal ones that I was going to buy would have been a minimum $30 from wholesale. Retail price would be more than 2 times that. Doing it yourselfandsaving money… not often it works like that.
Here are the dimensions for the handles as I made them:
I have started to put the dividers in. The top 4 drawers are all made the same way: 24 – 3″; x 3.75″; compartments per drawer. These are made from 1/4″; plywood that is just glued in, with the occasional nail. The next 4 down will be divided differently, with 12 compartments and the bottom 4 will be left alone until I can figure out what I want to put in them:
.jpg)
I’ve already started to fill the pull out bins. These will go from 1″; through to 3″; #8 flathead wood screws in the 6 bins (1″;, 1.25″;, 1.5″;, 2″;, 2.5″;, 3″;) as these are the sizes and type screw I use the most:
.jpg)
A video on putting in drawer dividers:
Finally, two coats of clear satin polyurethane. On all of the outside surfaces, even the back. This will help to keep the unit clean and seals the wood from moisture:
.jpg)
Dust collector is connected. That’s a piece of 4″; PVC pipe and it can be quickly disconnected from the mobile dust collector by pushing the pipe into the cabinet. Also seen in this picture are the holes I cut in the bottom of the ‘dust chamber’ to link it to the duct below.
I’m pleased to report that increasing the hole size in the top toward the edges seems to have worked. There is very even airflow throughout the surface of the top. A sanding test using my random orbit sander (with no dust bag attached) resulted in extremely low levels of airborne dust – a success for sure.
.jpg)


