


How to Make an Outdoor Workbench Workshop Projects
Back at my old house, behind my old shop, I had a table that was more or less a dedicated outdoor workbench. It started its life as a large assembly table inside my shop, but wound up outdoors when my needs changed. For more than two years I used that table for many different tasks, from cutting up sheets of plywood into smaller pieces, to spraying paint on cabinet doors and even metal work. It was rough and ready to be used for anything I had in mind. My steel work table and steel bench vise were both built almost entirely on that table, along with a number of other projects covered on this website.
Rather than keep the old one and move it here, I figured I would build a new one that was a bit smaller and better made. Of course, with all that I have been doing, it’s now more than a year later and still no dedicated outside workbench.
In the meantime I have been making do with sawhorses, but they don’t have the advantages of a fixed bench and are often being used for something else. With a few upcoming projects that should be done outside, I decided there was no better time to get the new one made.
The design is simple: I want a fairly large surface and I would like to have the ability to clamp a work piece down anywhere on the table. At first I considered a grid like my old one, but rejected that in favour of a top that has slots from end to end. The slots would serve another purpose, allowing water to drain off of the table quickly. This is important, since the table will be out year round, uncovered.
I also wanted a solid, sturdy frame, but not bulked up with extra braces. I want it open underneath, to get the lawn mower in to cut the grass. Later, this table will be setup on a concrete pad work area, but that is much further in the future. For now, it will be on the grass.
To get started, I cut a piece of 4×4 to 30″ long and made three notches in two adjacent sides. These notches receive stretchers and braces to form the base of the table:
.jpg)
.jpg)
The top notch (closest on the picture above, right) is 1-1/2″ deep and 3″ wide. The next one down is also 1-1/2″ deep, but 5″ wide. The notch 4″ up from the bottom is 1-1/2″ deep and 3″ wide. These were all cut using a circular saw and a rafter square to line up the cuts accurately. Note that each set has one opposite leg.
The first leg set assembled. The stretchers are 40-1/2″ long, cut down to 3″ wide from standard 2×4. The major bracing for this comes from the lower stretcher mortised into the legs:
.jpg)
.jpg)
The second leg set is then put together. Both are assembled using polyurethane construction adhesive and 2-1/2″ deck screws. I was careful to completely coat each notch with glue prior to screwing in the stretcher, as the glue will act to keep water out of the joint.
Next, I can get the braces made. I quickly made a template on a piece of plywood to draw the shape, then cut them out on the band saw:
.jpg)
Of course, these don’t have to be as fancy as this, but a little decoration goes a long way:
.jpg)
.jpg)
The braces are glued and screwed to the leg sets.
Before going any further, I need to add a cleat to the inside corners to help secure the long stretchers. These are glued to and screwed into the leg and brace:
.jpg)
.jpg)
The addition of the long stretches completes the base. These stretchers are glued to the braces, legs and short cleats, and screwed as well.
A single 2-1/2″ screw through the cleat and into the end of the long stretcher is sufficient:
.jpg)
.jpg)
It’s a good time (and great weather) to paint the base. Starting with a coat of primer, followed the next day with two coats of exterior enamel. I want to give the base a good layer of protection to start with, as I may never paint it again and I’d like it to last a good long time.
.jpg)
With the base finished, I could turn my attention to the top. It will be about 47″ wide and 72″ long, and made from 2×4’s that have been ripped in half. The reason for doing it this way is that I will end up with a top that is more stable, stays flatter and has the slots I want for clamping and drainage.
The 24″ ends cut from each 2×4 was also ripped and cut to 9-1/2″ long and 4″ long for spacers between the slats. In total, I used eight 2×4’s for the top.
To assemble the top, I set a 2×8 from my table saw to the workbench as a straight platform that’s long enough to support it:
.jpg)
The first slat is placed on the 2×8 and one of the 9-1/2″ spacer blocks is glued and nailed on each end. A 4″ spacer is put in the centre, then the next slat is glued and nailed on. I’m careful to put the nails near the bottom of the top, to reduce the chance of hitting one if I accidentally cut into the top.
Originally, I was going to try to put the top together all at once, but found it to be too unwieldy and hard to clamp. Instead, I did it in two pieces, clamped to dry overnight:
.jpg)
.jpg)
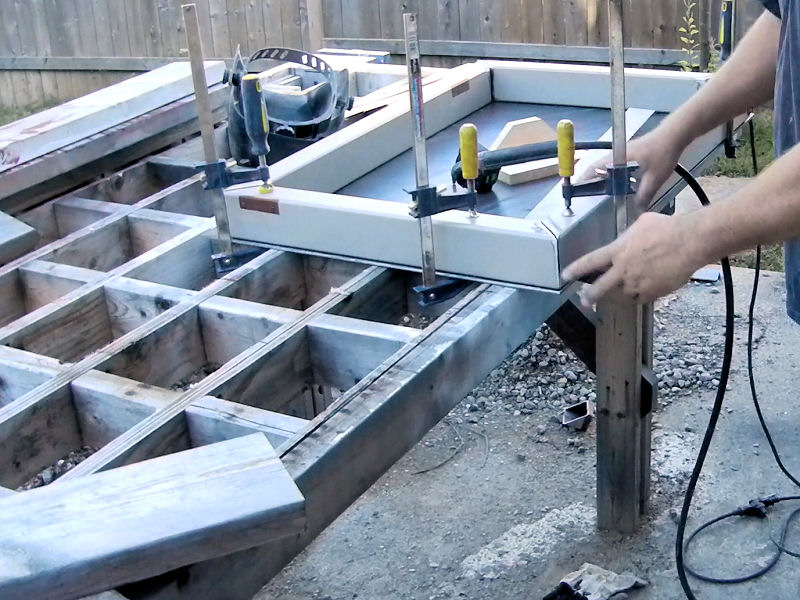
The next day I glued the two halves together and got a coat of primer on:
.jpg)
.jpg)
Top and bottom and between the slats. I expect I will give this a new coat of primer as the old one deteriorates.
I found what I think is the best location for the table, right beside my shed. Then it was just to set the concrete deck blocks in the right place and set the base in and level it. I intentionally left the legs short for these deck blocks, as they help to stabilize the table and add mass:
.jpg)
.jpg)
To attach the top, I added 3/4″ x 3/4″ cleats along both ends screwed in place.
I cut four brackets that fit around the cleat to screw to the underside of the top. These allow the top to freely expand and contract:
.jpg)
.jpg)
Before installing the top, I put a dab of construction adhesive in the centre of the end rails, then drove a screw up through the cleat into the top. This single fastening point in the middle leaves the top free on either side to move, while the brackets hold it tightly down to the base.
The finished table:
.jpg)
.jpg)
Almost too pretty to use!
I made a video showing the build from start to finish:


