


How To Make A Large Mobile Tool Box Workshop Projects
This new tool box project was inspired by my tool board, oddly enough. While planning a new workbench, I got to thinking about what should be under that new workbench. And then I looked at my tool board:

All of the tools neatly laid out out and within easy reach, it’s nearly a perfect solution for a workshop.
But it does have two things going against it:
– It’s a distance away from where I’ll use the tools, at the workbench.
– Dust collects on the tools.
I figured I could solve both of those problems by making shallow drawers beneath the workbench. Rather than walk back and forth to the tool board to use a tool, I can just open a drawer, use it, and put it back. And being inside the drawers, they stay free of dust.
I based my design on the very popular rolling mechanic’s style metal tool boxes that are sold everywhere. And I’ve made plans available and you can get those here:
Large Tool Box Plans
The plans work with this article and the build video that covers construction from first cut to final stroke of the paintbrush to finish it:

The Cabinet
The cabinet for this tool box is made from a single sheet of 3/4″ plywood. I started by breaking it down into easier to handle pieces with my circular saw:

Then cut the parts accurately on the table saw.
Here are the two side panels and these need rabbets cut on two sides: for the back and bottom panels of the cabinet. I find it helpful to mark the rabbets on the parts before cutting, since these need to be oriented opposite:

What’s left after the rabbet cuts are made needs to be the same size as the divider panel:

Lay the divider panel directly on top to compare and make adjustments as needed.
The sides and divider panel also need a short dado for the mid-stretcher. I made a simple guide for my trim router to accurately cut that:

The dado is on both sides of the divider panel:

It doesn’t look like it, but here are all of the parts cut and ready for assembly. The cabinet isn’t complex:

I’m using cleats to fasten the sides and divider panel to the top. These are 1″ square and glued in place with 1-1/2″ wood screws:

Important to put the cleats on the right side of the side panels – it’s on the inside where the rabbet is. The divider gets a cleat on both sides.
The Drawer Slides
Actually, it’s better to do this before you install the cleats, and that’s to mark out the locations for the drawer runners (or slides, if using the metal slides):

I used a story stick and a framing square to layout and draw the lines for the runners on all three panels.
The runners are fastened flush with the front edge and on that layout line with glue and 1/2″ pin nails:

The lines represent the top edge of the lower runner for each slide.
I could then get the upper runner installed using the spacer stick and mark the hole locations:

Marking the hole locations turned out to be unnecessary because I made a drilling guide from a piece of scrap maple and used that instead:

The guide kept the bit 90 degrees to the panel, plus acted as a depth stop to keep from drilling too far.
Here it is with the slides in place to test the fit:

They should slide freely with a small amount of play at this point.
I made a video showing how these drawer slides are made and installed and I recommend watching it if you are going to use these slides:
A couple of coats of waterbased polyurethane on the runners and space between them really helps to make them operate smoothly:

And while that is drying, I edge banded the top panel of the cabinet:

This is optional, especially if you are going to paint the cabinet a solid colour.
Installing the slides is easy – just put in place and drive in the #10 x 3/4″ machine screw:

You snug the screw down, then back it off two turns. The head needs to be below the surface, so check that and make the slots deeper if needed.
It’s a bit different for the divider since the slides line up on both side, the hole for the machine screw does too. So for these I used 1-1/2″ long screws that go right through the panel and put a nut on the end:

I used super glue to lock the nut in place and keep it from unscrewing.
Cabinet Assembly
The divider panel needs to be accurately placed before fastening it to the top panel. Here I’ve made a pair of marks that line up with the front edge and centre of the panel:

This gets it close, but then you need to fine turn it making the distance on both side of the divider panel as equal as possible. It’s very important for the drawers to take the time to make sure these panels are both parallel and spaced accurately. Ideally, you want all of the drawers to be exactly the same width to save time when cutting out the parts – there are a lot of parts!

Then fasten it in place with 1-1/2″ wood screws through the cleats and into the underside of the top panel.
An excellent way to make the spaces equal is to accurately cut two sticks the exact same length and use those as spacers:

The bottom panel is next and before screwing that in, I verified the length. Mine was slightly too short so I added a strip of edge banding on one end. This panel is fastened with 2″ screws on an angle like this:

Be careful not to make the angle too sharp, or the screw will go through the side of the cabinet. It might be helpful to draw a line on the front edge of the side panel to guide the bit while drilling the pilot hole.
The back stretcher as fastened with 2″ screws driven into the cleats:

Then the middle stretchers were glue in and the back panel screwed on, and here’s what it looks like fully assembled:

Mine ultimately won’t have casters, but I put ones on for now to make it easier to move around when it’s loaded.
Drawer Construction
All of the parts for the drawers are made from 1/2″ plywood. I started by cutting out all of the drawer sides first because these need to be rabbeted and I want to do them all at the same time:

I always make a sample cut in scrap plywood to get the saw set correctly before cutting the parts:

Then I ran all of the parts. The rabbet is the same on the front, back and bottom:

Rather than go from the drawings or measure with a tape, I prefer to put two side panels inside the cabinet and sneak up on the fit of the front panel:

The width of this front panel will be the exact width of the rest of the parts. You’ll want to make it so that it not tight – there should be some play for the drawer to slide freely.
The build video at the top of this page goes into more detail on assembling the drawers.
And here’s a drawer fully assembled and installed. I fastened the runners to the sides in the same way as I did with the cabinet panels:

This one was a little tight fitting, so I planed a bit off the drawer runners to improve the fit:

The upside of making the slides from wood is that they are very easy to adjust. Just need to be mindful of the pins driven in to hold the runners on, but those are typically driven below the surface. Sanding also works, though.
I made the drawer from from a pretty sweet looking piece of maple veneer plywood:

Hard to see in the photo, but this is curly grain. I took the time to edge band and pre-finish each blank for the two banks before cutting out the individual fronts.
I used cherry for the handles:

The piece I used had a lot of sapwood and I was able to hide most of that when cutting out the pulls. These get fastened to the top of the plywood fronts with glue and 1-1/4″ brads.
I tipped the cabinet over onto its back and used spacers and hot melt glue to install the drawer fronts:

The hot melt glue isn’t strong enough for a permanent connection, so I drove screws from the inside. I used 1″ screws and cur the tips off so that they wouldn’t poke through the front:

Fully assembled and ready to load up:

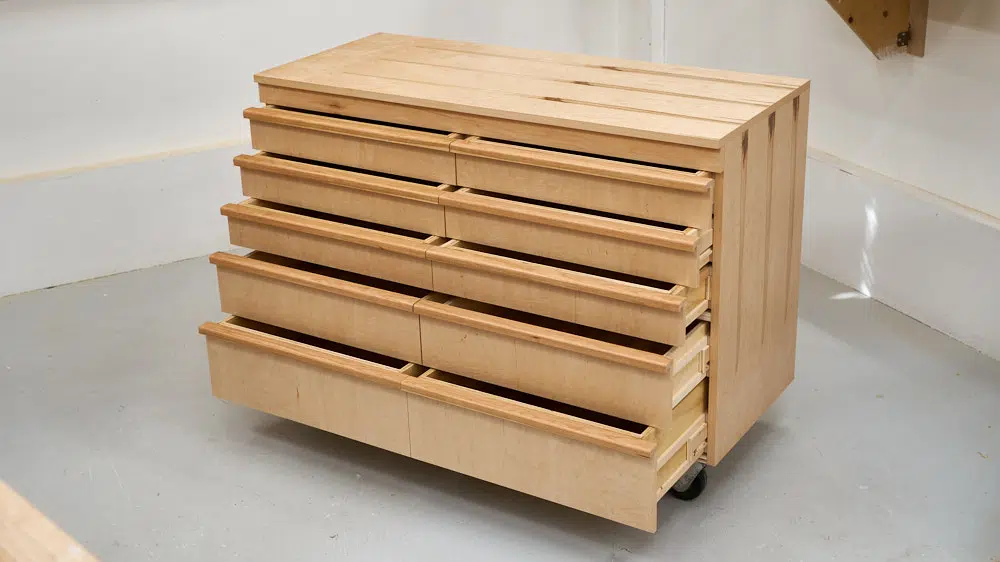
I’ll park it beneath my tool board for now. When I start working on the new workbench, I’ll take the wheels off and build the bench around it.
Plans are available for this project to get started on building your own today:


